How to Configure Local Backups on a cPanel Dedicated Server or VPS
This article provides step-by-step instructions on how to setup local backups on your Dedicated Server or VPS (assuming it has enough space) in WHM. If at any point you need help with this process, please contact us via a ticket or Live Support and we will be happy to further assist.
ℹ️ Before getting started, you may want to figure out roughly how much space you will need to store your first set of backups so you don't run out of space. Once you have a full backup, you can use that to estimate how many more backups you can safely store wherever you are storing them.
- If you are going to use the uncompressed or incremental backup method, the first backup will be approximately the same size as the cPanel accounts you backup plus 2.5-25 GB on average for system files should you choose to back those up.
- If you compress backups, the final stored backup will take up less space than the uncompressed original files, but you'll need a bit more local space initially since the system makes an uncompressed copy locally first before compressing the result. If you are saving the compressed backup remotely, keep in mind that while the system will only transfer the compressed backup to the remote destination, in the future, it won't remove an old compressed backup until the new compressed backup is fully transferred.
To configure the backups for your dedicated server, please use the following steps:
-
Log into WHM as root. You can usually do this by accessing https://your.server.hostname/whm in your browser.
-
Once in WHM, if the sidebar isn't visible, click the hamburger icon to expose it:

-
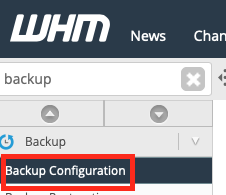
You can type "Backup" in the sidebar search box and then click on the Backup Configuration sidebar menu option:
-
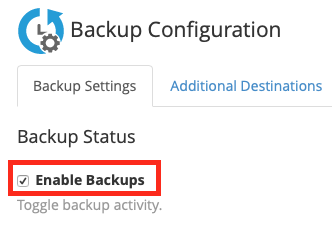
The Backup Configuration options will appear in the main part of the WHM window. If it isn't already checked, click on the Enable Backups check box so that when you save these options, the system will back up data as you specify below the next time the backup process is run (typically overnight local server time).
-
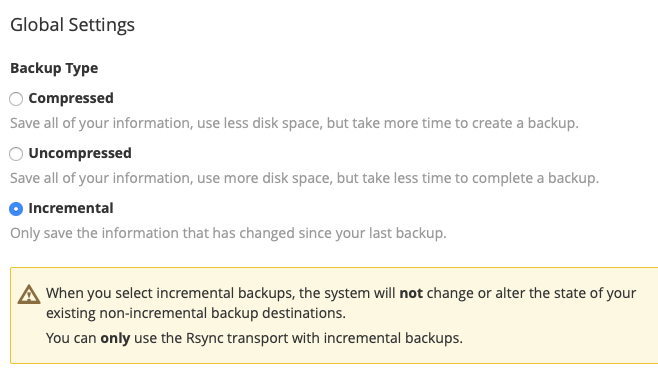
Next, you will want to choose one of 3 backup types:
-
Your choices are:
-
Compressed - Select this setting to save all of your backup data in a compressed format. This setting uses less disk space for the finished backup, but it takes longer to complete. All of your files are duplicated and stored in each compressed backup. The backup is stored as a single gzip compressed .tar file.
-
Uncompressed - Select this setting to save all of your backup data without compressing it. This setting uses more disk space, but is faster than **Compressed **backups. All of your files are duplicated and stored in each back up every time backups are run. Uncompressed backups are stored as a single .tar format file.
-
Incremental - This backs all files individually and only makes copies of the files that changed since the last time a backup was made. This setting limits your remote backup options, but runs faster and may use less disk space (if you keep multiple backups) than other backup types.
ℹ️ Most people will probably want to use compressed or incremental backups.
- Compressed backups take a while to create, but they save a fair amount of disk space (depending on the types of files being backed up) and it allows you the widest possible number of remote backup options.
- Incremental backups generally take less time to create and since additional backups only backup changed files, you can save a lot of space. This backup type also makes it easier for you to manually restore a single file or two via SSH, should you need to do so. Your only option for remote backups with this backup type is rsync.
-
-
Select whether you want have cPanel check the amount of available disk space prior to starting a backup. To enable this feature, check the Check Available Disk Space option and enter a number of MB or a percentage of available disk space that has to be free (unused) before the backup system will make a new backup. This can keep the backup system from accidentally using 100% of available disk space if you are careful. Once you know how much disk space a typical backup uses, you can adjust this setting to take that into account.

⚠️Important!
Keep in mind that cPanel's backup system does not remove old backups until the new backup completes without errors, so you'll need to ensure there is enough available space for that to happen.
-
Next, you can alter the Maximum Destination Backup Timeout if you wish (adjusting this is optional). This is the amount of time cPanel will wait while trying to send a backup file to the destination where it will live. For example, if you choose compressed backups, this this the number of seconds cPanel will wait while trying to transfer the backup to the local or remote destination.

⚠️ This can be set to anywhere between 300 and 50,000 seconds. If you set this too low, you might have incomplete remote backups if the connection between the local and remote server isn't great or this time is set too low for your largest backup. Alternately, setting this too high might cause the backup to take a lot longer to complete if the connection isn't great.
-
If you want to, you can also alter the Maximum Backup Restoration Timeout value (adjusting this is also optional). This is the number of seconds cPanel will wait while restoring a file from your backup to the server. If a single backup restoration takes longer than this amount of time, cPanel will stop trying to restore it and move on to the next one. This can help keep the restore process from freezing up if you are trying to restore a damaged file.

⚠️ This can be set to anywhere between 600 and 86400 seconds (10 minutes to 24 hours). Setting this too low may mean exceptionally large backups may not get restored and setting it too high may mean your backup doesn't complete in a reasonable amount of time.
-
Next, you can start choosing how often you want backups made and how many you want to keep. You start by adjusting settings for daily backups. If you'd like to make and keep at least one daily backup, check the box next to Daily Backup.

-
Once Daily Backup is enabled, you can select the days you want to make backups. If a day is unchecked, daily backups will not be made on that day, but weekly or monthly backups will still run if they are enabled.

-
Finally, you should specify the number of daily backups to keep and whether or not cPanel should be more strict on how it handles backup retention. For example, if you choose to make daily backups every day and to retain two of those backups, the system will keep the most recent two successful backups and remove the oldest one once a third successful backup is completed.

⚠️ Critical!
Backup retention under cPanel may not work the way you expect, so before you decide whether to check or uncheck Strictly Enforce Retention, Regardless of Backup Success you should read what cPanel Inc. has to say about how retention works:
- CLICK HERE to read about how normal retention works.
- CLICK HERE to read how strict retention works.
-
Now you can choose how you want weekly backups handled if at all. The process is similar to the daily backups listed above. You can turn on Weekly Backups by checking the box next to it:
-
Then you pick a single day each week that you want the weekly backup to be created.

⚠️ Be Aware
If you have daily and weekly backups configured to run on the same day, on that day, cPanel will make the daily backup and then make a copy of the same backup and save it as the weekly backup.
-
Next, you select how many weekly backups you wish to keep and also decide whether you want strict backup retention. Review the documentation for backup retention in step 12 above. The same rules apply here.

-
You can also choose to enable monthly backups by checking the box next to Monthly Backup.
-
Then you can pick one of two options for when the monthly backups will be made. Check the appropriate box or both if you wish. Your options are The 1st Day of the Month or The 15th Day of the Month:

⚠️ Be Aware
If you have daily, weekly and monthly backups configured to run on the same day, on that day, cPanel will make the daily backup and then make a copy of the same backup and save it as the weekly and then monthly backup. Be aware that this may mean at least once per month every backup will be exactly the same).
-
Finally, you select how many monthly backups you want to keep and whether you need normal or strict backup retention (just as with the daily and weekly backup options above):

-
In the Files section, you will choose the type of content you wish to back up. Your first choice is whether to back up cPanel user accounts or not. To enable backing up cPanel user accounts, check the box next to Back Up User Accounts. You can also press the Select Users button to open a separate window where you can specify which cPanel user accounts you want to back up.

ℹ️ We recommend that you do backup cPanel accounts.
-
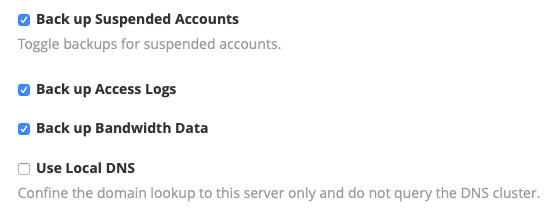
There are additional options that control how and what accounts get backed up. Here they are:
-
Back up Suspended Accounts: This setting controls whether accounts that have been automatically or manually suspended get backed up by cPanel or not. If you turn this off, you will save space in your backups. However, if something should go wrong and you need to restore and reactivate a suspended account, you may not have a backup to restore from. Suspended accounts typically do not change while they are suspended in any significant way. If you don't back up suspended accounts automatically, you could always manually create a single compressed backup of the account and store it where ever your backups are kept to be safe.
-
Back up Access Logs: If you enable this setting, cPanel will automatically back up the raw web server domain logs for each domain, which are used to create and update the web statistics and metrics used by programs like AWStats. Enabling this will increase the size of backups, but will ensure that all raw (unprocessed) web stats are retained so they can be parsed later. Typically on cPanel servers raw web domain logs are only processed once per day, so there may be a significant number of unprocessed logs for busy websites.
Regardless of what you decide to do with the access logs, processed web log data that appears in web stats programs like AWStats will not be affected and that data will be backed up by the system so long as cPanel account backups are enabled and the system doesn't have permissions issues accessing the stored processed log files.
-
Back up Bandwidth Data: Enable this to back up bandwidth usage (traffic) data from /var/cpanel/bandwidth. That is the data that WHM and cPanel use to display per-account bandwidth totals. It isn't critical for the functioning of the cPanel account, but If you impose bandwidth limits on accounts and they need to be restored from backup, the recent bandwidth data will be missing. Generally, it is a good idea to back up bandwidth information.
-
Use Local DNS: This is of primary concern if you use a cPanel DNS clustering system. Most people can leave this unchecked. If it is checked, cPanel will only backup the locally stored copy of the DNS zone. If it is unchecked and you are using a configured cPanel DNS cluster system, cPanel will back up the copy of the DNS zone stored on the cluster instead. If it is unchecked and you are not using a configured cPanel DNS cluster, the local name zone file will be backed up anyway. The only time you'd likely want to check this box is if you have a DNS cluster and you know that for some reason one or more local DNS zones have unsynched changes or if the connectivity between the local server and the DNS cluster is bad.
-
-
The last option in the Files section is Back up System Files and this should definitely be checked so they get backed up locally. This will allow you to manually restore some critical system cPanel files and directories that will be useful if you need to restore your entire server.

⚠️ Important Information
You should review the information cPanel Inc. provides about backing up system files. This includes a list of the files backed up and how to add custom files to the backup:
https://documentation.cpanel.net/display/76Docs/System+Backups
-
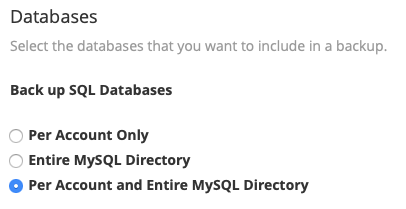
Moving on to the Databases section of the backup configuration options, you can configure how cPanel handles backing up supported databases (which right now includes MySQL or MariaDB). PostgreSQL databases are backed up per-account if you have PostgreSQL enabled and those database back ups are not affected by what you choose here. You can select one of the following options:
-
Per Account Only: If you choose this, only databases created by or listed in cPanel user accounts will be backed up. This does not back up databases created outside of cPanel like the core MySQL/MariaDB database. This setting may make it hard to recover from some types of database corruption.
-
Entire MySQL Directory: Whether you are using MySQL or MariaDB, the databases are typically stored at /var/lib/mysql/ and if you chose this option, that entire directory will be backed up. This will make it easier for you to restore MySQL or MariaDB in the case of corruption or widespread damage, but it will make it more difficult to restore databases to individual cPanel accounts.
-
Per Account and Entire MySQL Directory: This is the best of both worlds, at the expense of some additional time and disk space. cPanel backs up every MySQL or MariaDB database per account (to make restoring individual cPanel account data easier) and it also backs up everything in /var/lib/mysql separately in case you need to restore all MySQL or MariaDB databases.
⚠️ We strongly recommend that you choose Per Account and Entire MySQL Directory. This will ensure the widest options for data restoration if something goes wrong.
-
-
In the final section of the main backup configuration options, you configure the local server location where backups are made and/or stored. By default this is usually /backup - and if you have a second hard drive for backups with its mount point there, then you won't need to change anything and the system will backup to the secondary hard drive.

ℹ️ If the directory you specify above does not exist, cPanel will create it when backups are run next time. You should make sure there is enough space to create backup files in this location, even if you don't plan to keep a local copy of the backups.
-
If you want to store a copy of your backups on the local server in the location specified in step 23 above, make sure Retain Backups in the Default Backup Directory is checked. If you don't have remote backups enabled and you try to save this configuration without storing backups locally, you will receive an error.

⚠️ Generally it is a good idea to store a copy of your backups locally (unless you are on a space-limited VPS). At this time, cPanel cannot automatically restore from remote backups. If you disable local storage of backups, backup restoration features in WHM will be disabled. In that case, you will need to manually retrieve your remote backups to your local server and then you can use /usr/local/cpanel/scripts/restorepkg to restore the accounts.
-
If the backup location you specified in step 23 is on a separate drive or mount point, you can choose to have cPanel automatically mount and unmount it as needed. This option won't do anything if the location you specify isn't set up as a mount point on the local server.

⚠️ Mounting the backup location as needed may be somewhat safer, but you also run the risk that issues with mounting the backup location could delay or completely stop backups from being made.
-
If you are comfortable with the backup configuration changes you have made, click the Save Configuration button. If you want to ensure your backup configuration changes are not saved, click the Reset button instead:

ℹ️ Remote Backups
If you would like to configure additional local or remote backups, please see the following article:
How to Configure Additional Backup Destinations on a cPanel Dedicated Server or VPS
Additional Information:
After configuring backups, we recommend keeping an eye on your "/backup" mount over the next few weeks to ensure that your configuration is appropriate for the amount of resources you have available. If you notice you are running out of space, we recommend archiving and/or deleting old accounts and content, as well as retaining fewer backups.